Pomoc
- Basics
- Applications
- Employee
- Planned Schedule
- Executed schedule
- Notifications
- Reports
- Company
- Manager duties
- Other
Overtime export
The Export Overtime Report is used to export overtime hours to an XLS file.
To do:
- 1Mark overtime
-
Before generating the monthly payroll, mark all overtime hours to be paid on the given one payroll.
- 2Generate file
-
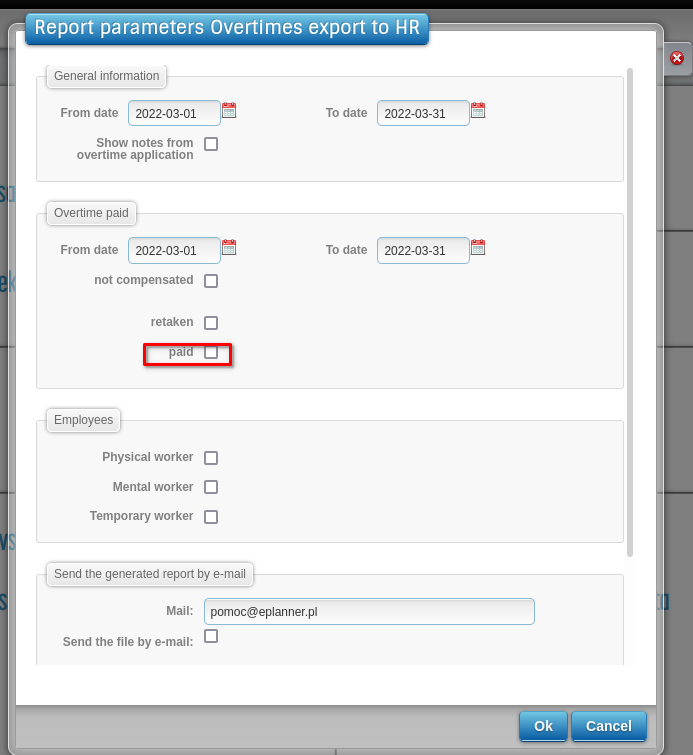
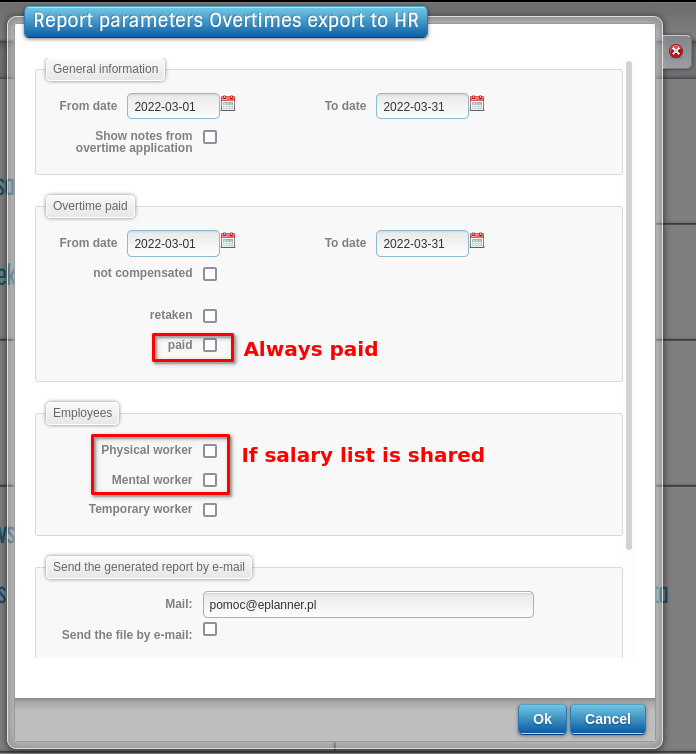
Generate an overtime export file for a given month only marked as paid , e.g. overtime for December. Open the window with parameters for overtime export, then set the options.
General data section The dates in this section are to allow for the collection of data about night hours in a range other than overtime. They are there for to charge, for example, nightly for the entire month, and overtime for the period up to the 25th. Over time, we can add to general data, e.g. hours worked.
Section Overtime paid
The section will be renamed Overtime Data.
Dates to determine the range from when to when overtime is to be (not only paid):- not compensated - overtime not collected and not marked for payment [0 - in column G]
- received - overtime received [2 - in the G column]
- paid - overtime marked for payment [1 - column G]
Employee section
- Physical - data on employees marked as physical
- Mental - data about employees marked as intellectual
- Temporary - data on employees marked as temporary
- 3Check report
-
The end result is, for example, the file "export_overtime.1514991718.csv" with example data:
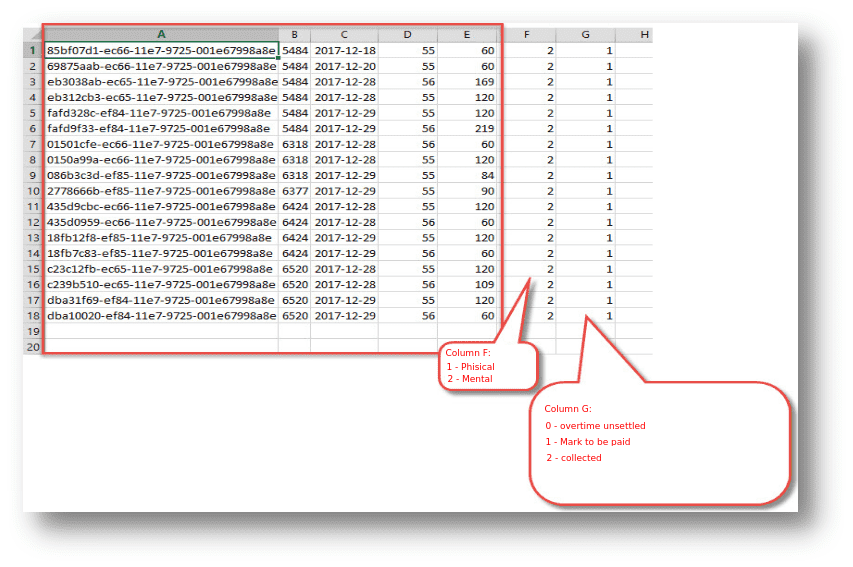
File content:
- Column A - it is a unique identifier of paid or received overtime
- Column B - Employee ID
- Column C - overtime date in the format YYYY-MM-DD
- Code 55 - means 50% daily overtime
- Code 56 - means 100% daily overtime
- Code 48 - means 100% overtime ?? ? ie the potential average weekly 100% of the FA
- Code 48 N - means 100% overtime ?? ? that is, the potential average weekly 100% of the FA occurring in sundays
- Code 57 - means night hours
- Column E - number of minutes
- Column F :
- 1 - manual worker
- 2 - white-collar worker
- Column G :
- 0 - non-compensated overtime (i.e. not marked for payment or collected)
- 1 - overtime marked for payment
- 2 - overtime received
The last two columns contain information about the type of employee and the type of overtime:Jeśli są problemy z importem to spróbuj usunąć kolumny F i G. Dzięki temu, że je mamy możemy skontrolować czy wszystkie nadgodziny są wyeksportowane. Co miesiąc powinno być wykonane oznaczenie nadgodzin, a następnie eksport tych nadgodzin, które są wypłacane co miesiąc.
- 4Oznacz nadgodziny
-
Na koniec OR należy oznaczyć te nadgodziny, które nie były odebrane i oznaczone do wypłaty na listach miesięcznych, a mają być płacone na liście płac za nadgodziny średniotygodniowe za dany OR. Jeśli firma ma obiekty różne okresy rozliczeniowe np. 2 i 4 miesięczne OR, to zaczynając od 2018 roku:
- na początku marca powinny zostać oznaczone nadgodziny za I i II 2018 w obiektach z 2 miesięcznym OR, a następnie należy wykonać eksport z ePlanneR-a i import na listę płac (jeśli zostaną oznaczone nadgodziny, również pracowników z obiektów 4 miesięcznych to ich dane również pojawią się w takim eksporcie)
- w maju powinny zostać oznaczone nadgodziny za I - IV w obiektach z 4 miesięcznym OR, a następnie eksport z ePlanneR-a i import na listę płac.