Pomoc
- Basics
- Applications
- Employee
- Planned Schedule
- Executed schedule
- Notifications
- Reports
- Company
- Manager duties
- Other
Generating schedule for the entire month
The generate schedule option is available in an unapproved scheduled timesheet. You can generate a schedule by
planning work for each day of the week (daily generator), or by planning work for each week (weekly generator).
- 1Generating a daily schedule
-
To generate a schedule, click "Generate a daily schedule". Next:
- Set the time period for which the schedule will be generated
- Select the employees for whom the graphics will be generated
- Ustawić czas pracy
- Separately on different days of the week for different employees
- In total, for selected employees, different working hours on different days of the week
- In total, for selected employees, the same working hours for all days of the week
- Set markers (if different from the default) that will appear in place of Saturdays, Sundays and holidays (similar to setting the working time)
- Kliknąć Zapisz
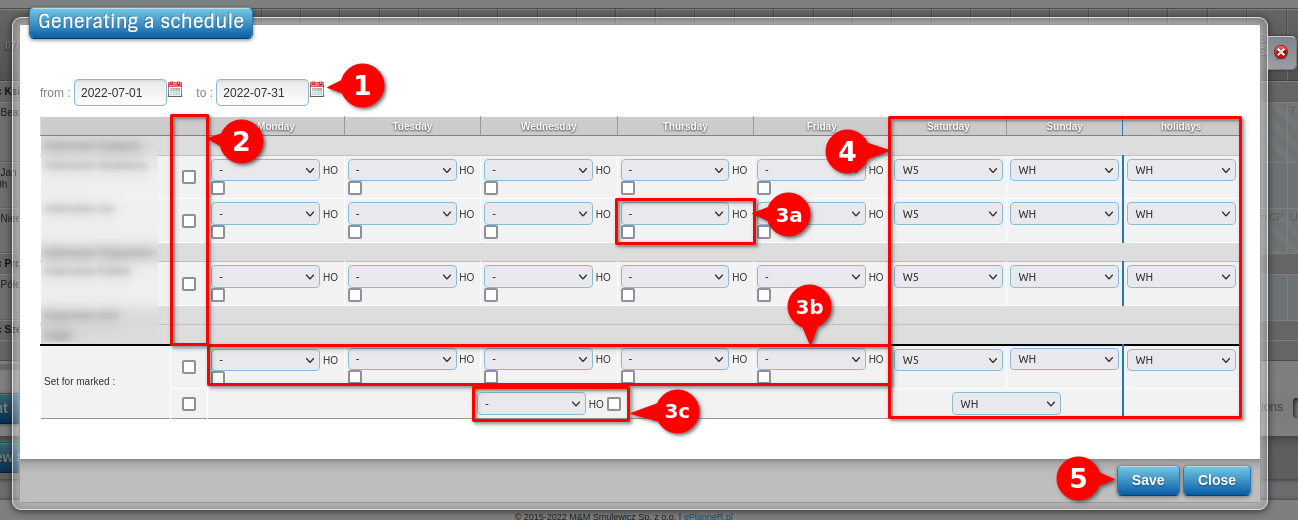
The working times will be marked on the schedule in accordance with the previously provided guidelines. If the period of time you want the generated work already contains absenteeism or other work, these days will be ignored when generating. Graphic artist can be generated for more than a month, but not later than the end of the accounting period.
- 2Generating a weekly schedule
-
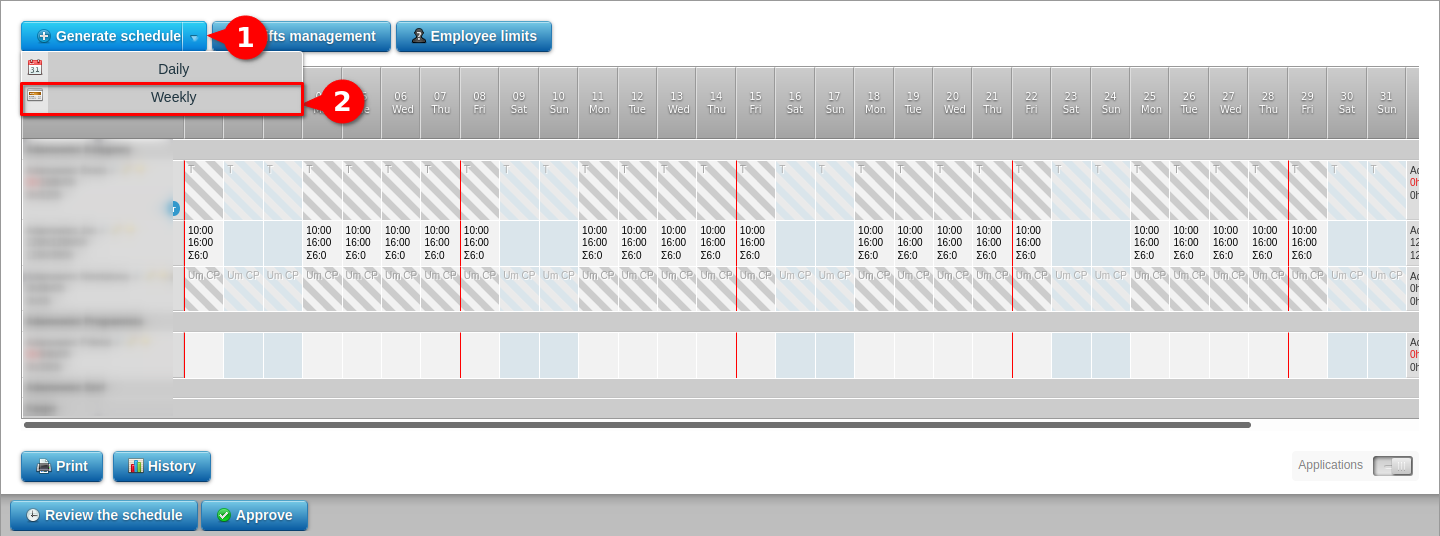
To generate a weekly schedule, hover the cursor over the "generating schedule" button (Fig.1 [1]) and select weekly method (Fig. 1 [2]), as shown in the figure:
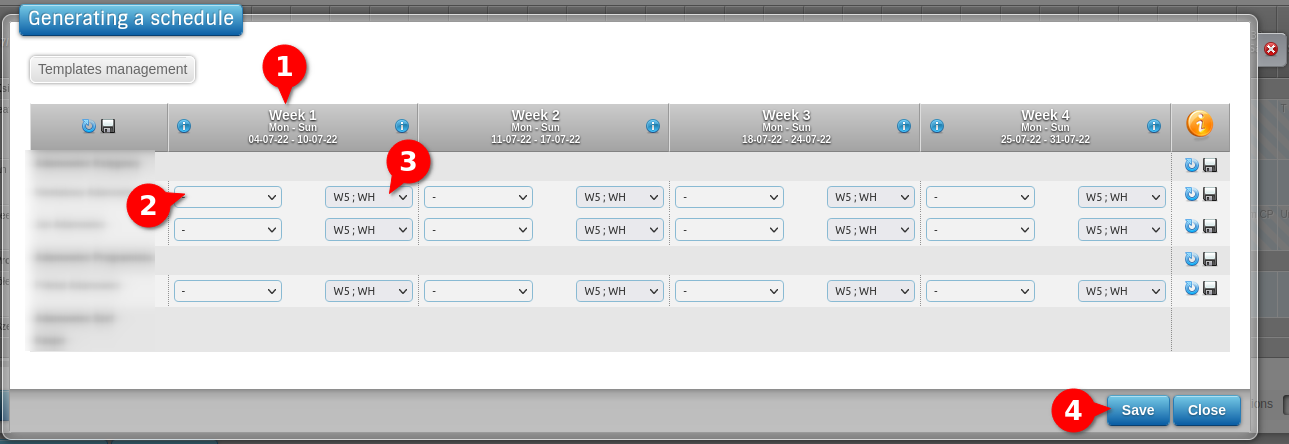
After selecting the weekly generator, a window opens with the following information:
- Definition of a month divided into full weeks (Fig. 2 [item 1])
- List of employees assigned to the object
- Drop-down list of changes to be selected for weekdays (Fig.2 [item 2]). This is where the changes defined in object or company.
- Drop-down list of templates to select for Saturdays, Sundays / Holidays (Fig.2 [item 3]). You can choose the following options:
- "W5 ; DH" - means inserting the marker W5 in a given week on Saturday, and marker DH on Sunday;/li>
- "W; DH" - means inserting in a given week on Saturday the same work as set for this week change, and on Sunday marker DH;
- "W5; W" - means inserting the W5 marker in a given week on Saturday, and on Sunday as set in this week shift;
- "W; W" - means inserting work on Saturday and Sunday in a given week as set for this week change;
The generator allows you to plan work in full weeks, starting from Monday to Sunday, hence e.g. in June 2021, the first week starts on June 7 and ends on June 13. The general rule is that we plan work for full weeks, including the last week, which may end in the next month. IN in the case of June, the last, 4th week will also cover the following month of July until 04/07/2021.
When using this generator for the first time since starting this function, you can first insert the Daily generator work in the first, incomplete week, and only then use the Weekly generator.
Example:
Generating work in 4 weeks of June, according to the rule: 1 full week - 1st shift, 2nd week - 2nd shift, 3rd week - 3rd shift shift, 4th week - 4th shift
The month was divided into the number of full weeks (in this case, 4 full weeks) (Fig. 2 [1])
In the work generator, in the first week 07-06-2021 - 13-06-2021 in the first drop-down list (Fig. 2 [item 2]) we set the correct shift, in the example 08:00 16:00. In the second dropdown for this week, we set diagram of marking Saturdays / Sundays in the example "W5; DH" (Fig.2 [item 3]).
We repeat the operations for each week of this month. You must complete the changes, click "save" (fig. 2 [item 4])
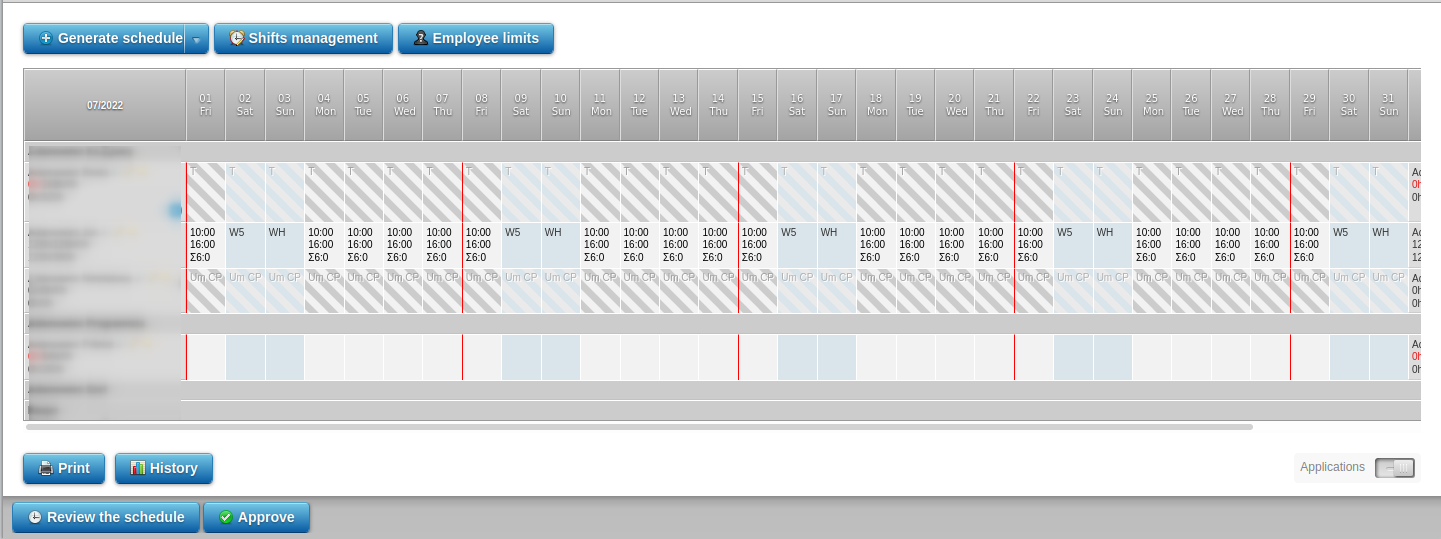
ePlanneR, before saving the work, will check the correctness of the labor law and then insert in individual work days or markers for the planned graphic. After saving the introduced changes, we will have a view on the work planned in this way on the schedule (Fig. 3) (The first incomplete week was previously completed with the first shift.)
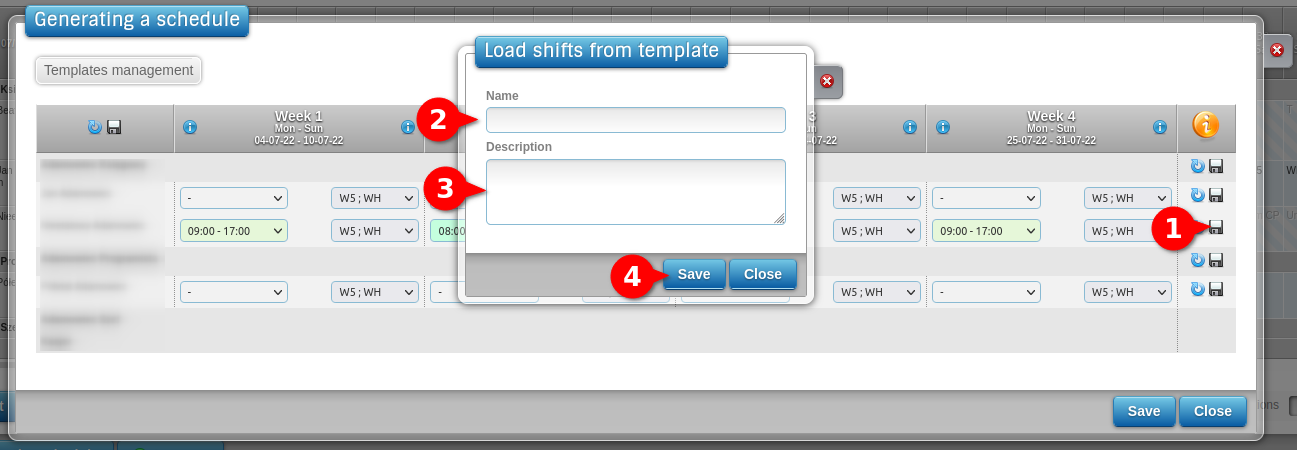
Month templates
The weekly generator also has the option to save the changes made as:- Template for an employee (fig. 4)
- Template for a specific position (fig.4):
- Template for the whole object (fig.6)
The employee template can be launched by clicking the diskette icon in the row of a given employee (Fig.4 [item 1]), then you should give a name for the template (Fig. 4 [item 2]), optionally a template description (Fig. 4 [item 3]), and save (Fig. 4 [item 4]).
To start the template for a specific workstation, click the icon in the row with the workstation name (Fig. 4 [item 5]).
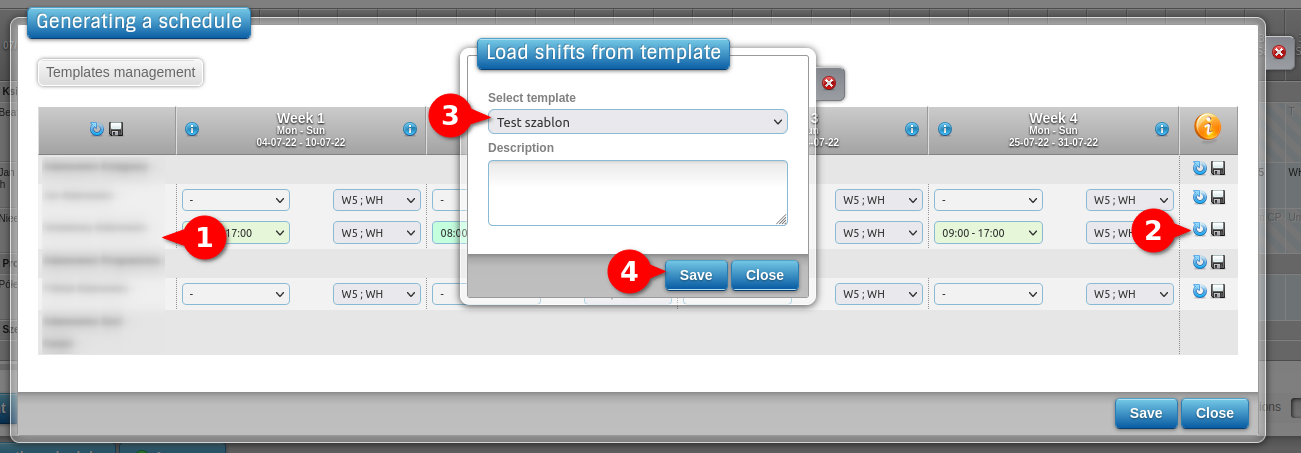
To use a template, click on the blue arrow icon (Fig.5 [item 2]), then select the appropriate template from the list of saved templates (Fig.5 [item 3]), click save (Fig.5 [item 4]).
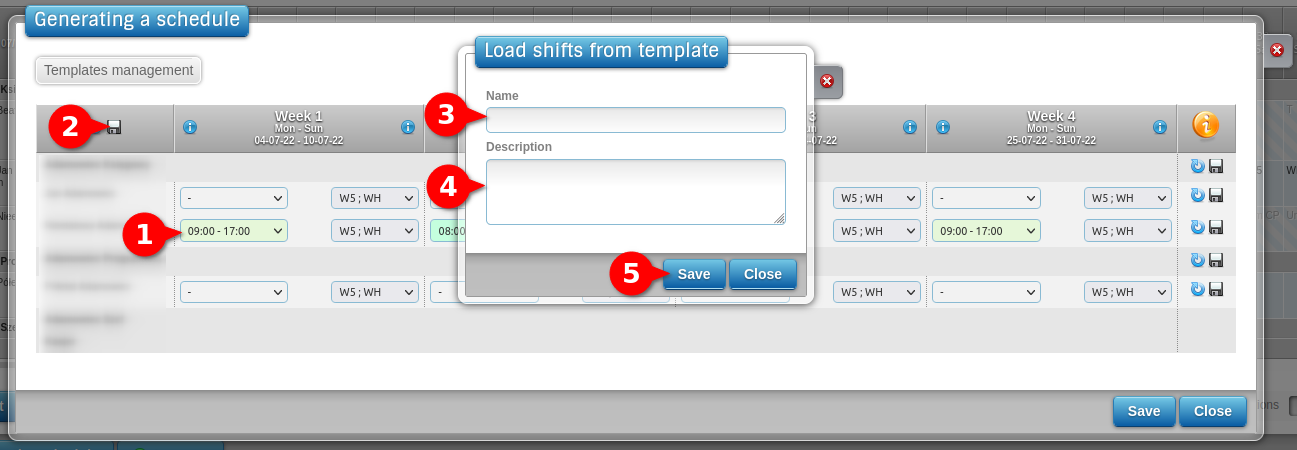
We create a template for the entire object as follows:
- We set work by weekly generator for all employees assigned to the facility (Fig. 6 [item 1]);
- Click on the floppy disk icon in the table header (Fig. 6 [item 2]), name the template (Fig. 6 [item 3]), we can optionally add a template description (Fig. 6 [item 4]), and save it (Fig. 6 [item 5]).
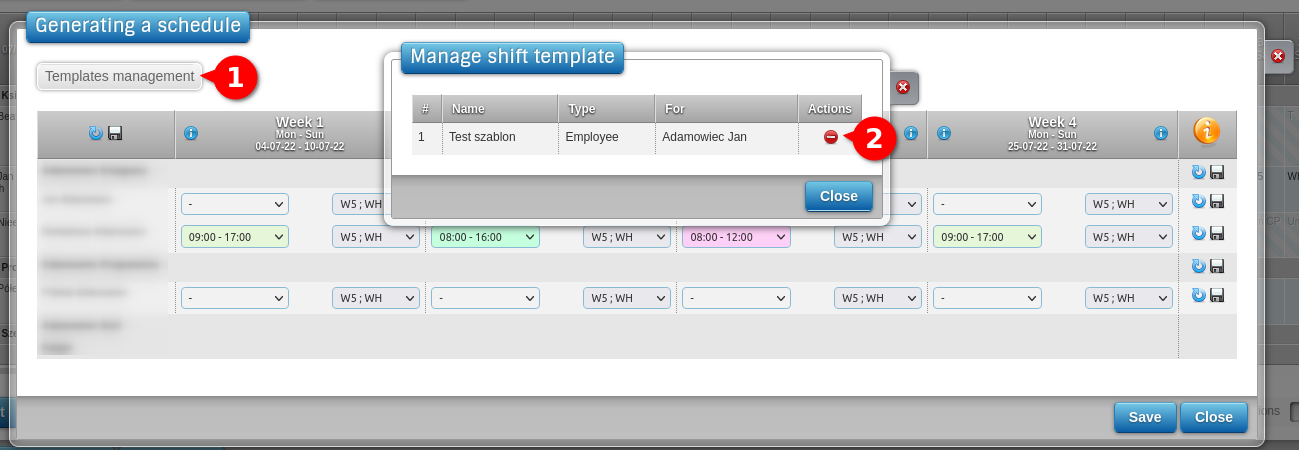
To see all saved templates, click on "template management" (Fig.7 [item 1]). In this window we can view the list of available templates and we can delete the saved template, just click on the button minus on a red background (Fig. 7 [item 2]).