Pomoc
- Basics
- Applications
- Employee
- Planned Schedule
- Executed schedule
- Notifications
- Reports
- Company
- Manager duties
- Other
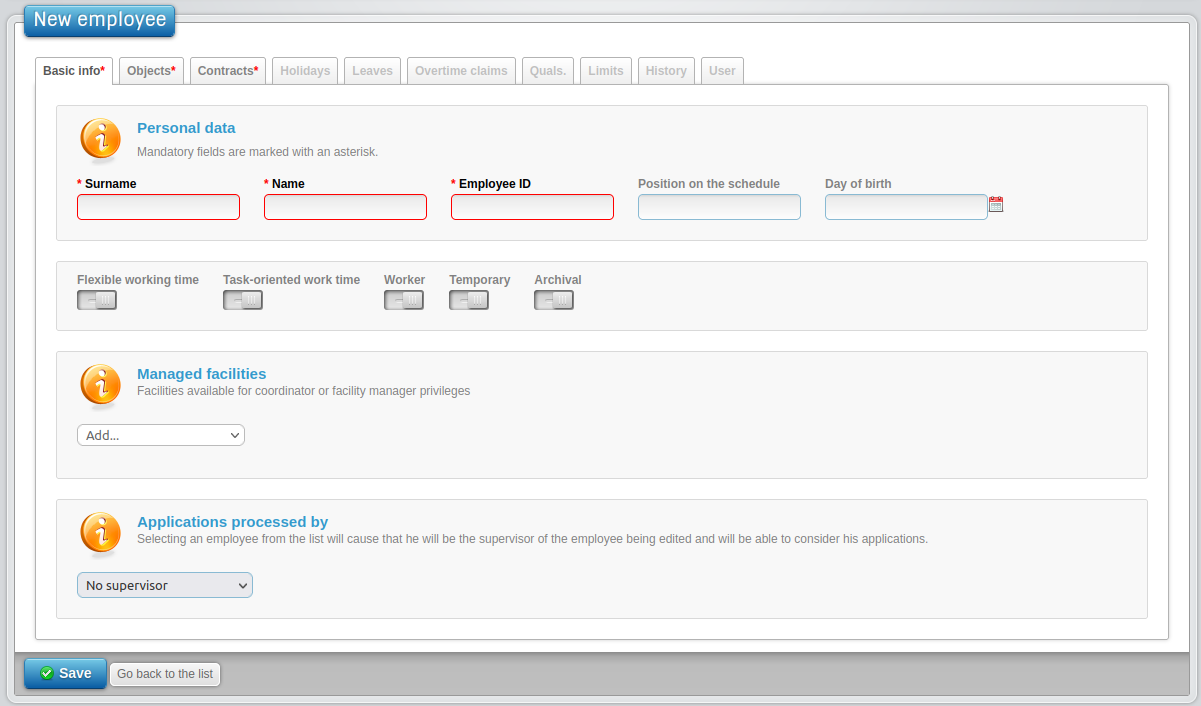
Add new employee
By clicking "Add new employee" user opens form, that allows to add new employee to the app. Required data are placed "Basic data" and "Contracts".
To do:
- 1Add employee
-
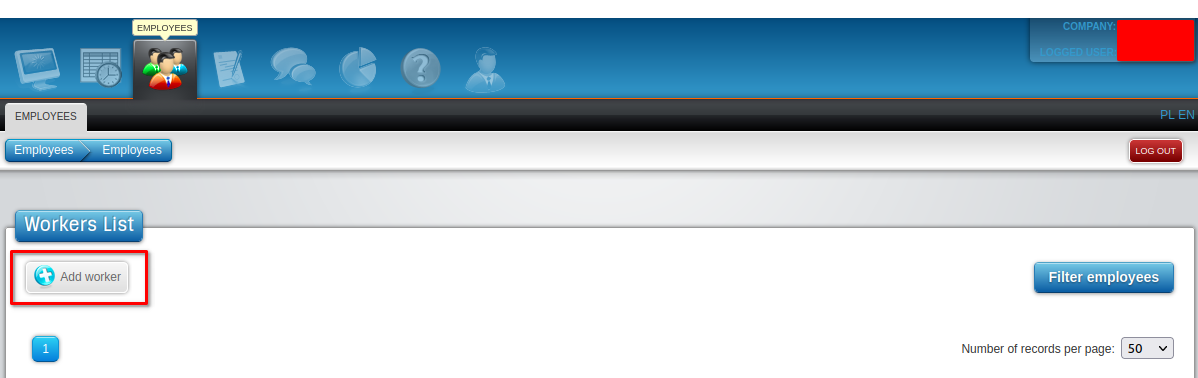
Open Employees tab and click "add employee" placed above the employees list.
- 2Basic data
-
In "Basic data" section there are following fields:
- Surname
- First name
- Employee ID number in company - a unique identifier of the employee, thanks to which we will be able to associate data from ePlanneR (e.g. the number of overtime hours) with data on the payroll in external HR and payroll systems - within the company it must be a unique identifier
- Position on schedule - optional field - by giving numerical values there, we can change the order employees on a schedule (instead of alphabetical on their own)
- Managed objects - if the employee has manager permissions
- Supervisor for requests - if this option is enabled in the company (if not, for the employee's requests the person examining the applications of the entire facility in which the employee is located will be responsible)
- 3Basic data - employee tags
-
There is an "Employee Tags" section in the employee basic data.
 The following tags can be set:
- It is subject to labor law - allows you to decide for which employees should check the provisions of the labor law during calculating schedule ("Calculate schedule"). Is a mandatory setting for salaried employees. Employees under a mandate contract, specific task contract, B2B, contract should have this tag turned off. After clicking "Calculate schedule" function, the system skips checking employees who have this tag turned off.
- Flexible working time - if an individual employee in the company works according to the rules of the so-called flexible working hours, then enabling this function changes the checking of the labor law rule for this employee. Instead of keeping an eye on the full one During the working day, the occurrence of 11 hours of daily rest is checked. If it is put on the level of the entire company or the entire facility (tab Company -> Company data -> Flexible working time throughout the company), it does not need to be set up for the worker.
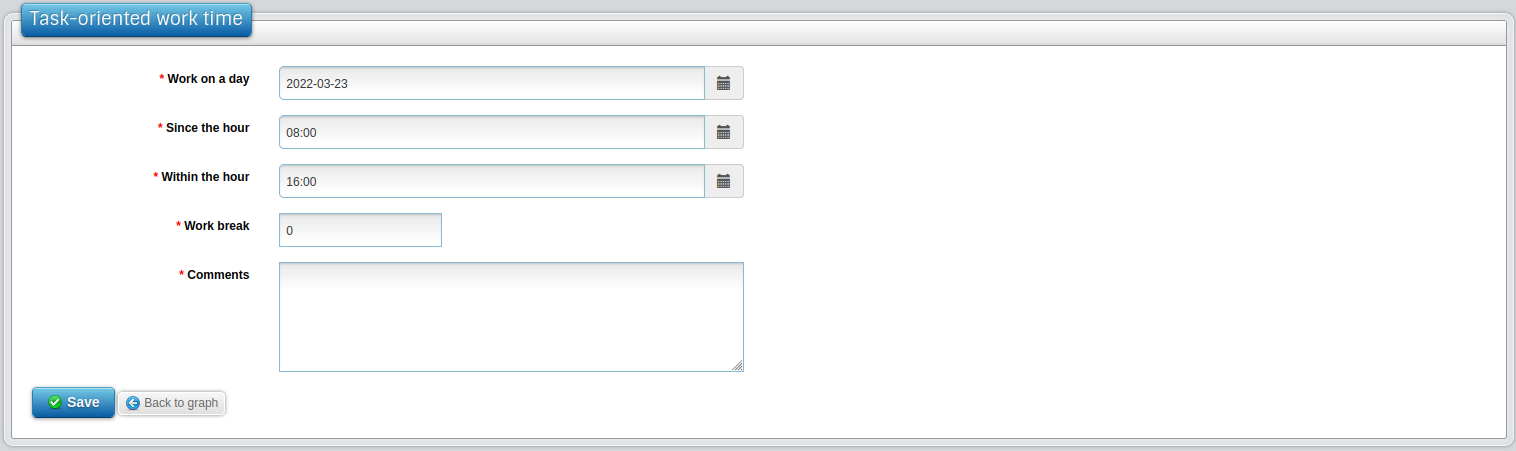
- Task based working time - enabling the tag allows the employee to enter or change it on their own
planned work by clicking on a cell on the schedule (on the Applications page). All employee shifts
will be saved on the schedule being performed.
- Position on schedule - optional field - by specifying numerical value there, we can change the order employees on a schedule (instead of alphabetical on their own)
- Physical - it is only used in the "Export Overtime" report, it allows you to set up employees physical in the company. The default is that it is a white collar worker (disabled).
- Temporary - it is only used in the "Export Overtime" report, it allows you to set up employees temporary in the company. By default, the option is disabled.
- Archive - an employee who has finished work in the company should be set with the tag archival employee. Thanks to this, such an employee will not appear on the list of employees and will not be notified on the "Notifications" tab. Additionally, the Leave status report allows you to omit archival employees. Employee in when the Archive attribute is enabled, the user account is automatically disabled. Attention! Setting this tag does not affect the presence of this employee in Schedules. This is determined by the current contract in "Agreements" tab
- 4Basic data - managed objects
-
If you are viewing the data of an employee who is a manager or has the permissions of a coordinator, then in the "Managed objects" there is information which objects a given employee can manage (schedule management, preview on the "Employees" tab, acceptance of leave requests).

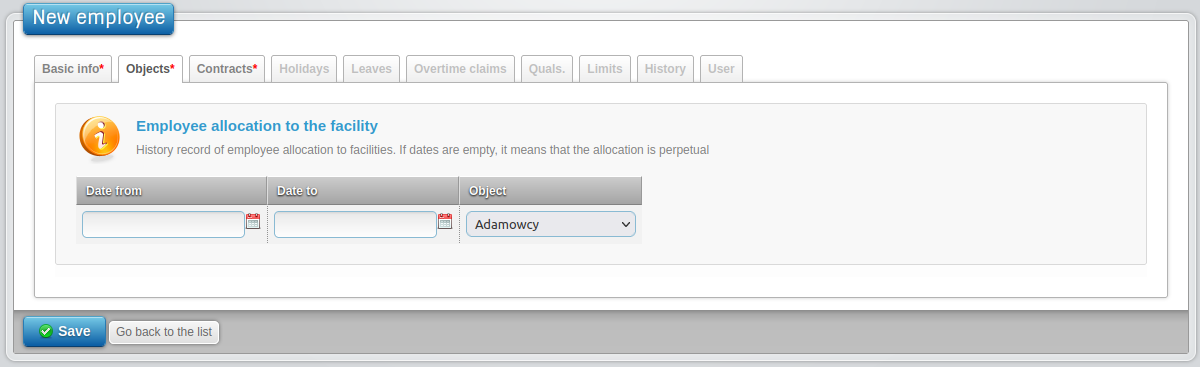
- 5Objects
-
The "Objects" tab allows you to enter the assignment of a given employee to an object. It also allows you to change the quota employee to the object when he changes department in the company. On the screen, enter the start date of assignment to an object and select the object.
- 6Contracts
-
This tab contains the mandatory employee's data regarding the current employment. When adding a new employee or When editing an existing one, set the following fields:
- Contract type - All possible types of employment contracts are available, both full-time and contractual civil law, contracts or B2B
- Position - from the dictionary of positions in a given company, you can select the position in which the employee works
- Part time - for employees on employment contract, e.g. 1/1, 1/2; for employees on a mandate contract or B2B field any values can be entered, e.g. 0/0
- Conclusion of the contract - required field
- First day at work - we set the same date as in the "Conclusion of the contract" field
- End of an agreement - mandatory field for a fixed-term contract, trial contract, etc.

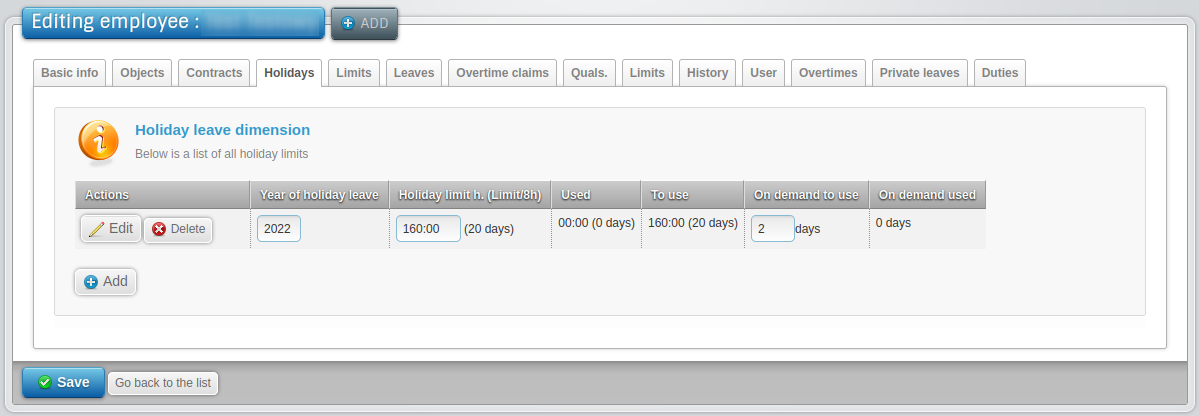
- 7Leaves
-
In this tab, we can add the current amount of leave that is due to the employee. After clicking "Add" in the Leave year field, enter the year for which the leave is due and enter the due date for an employee in a given year, both the annual leave and the leave on demand.
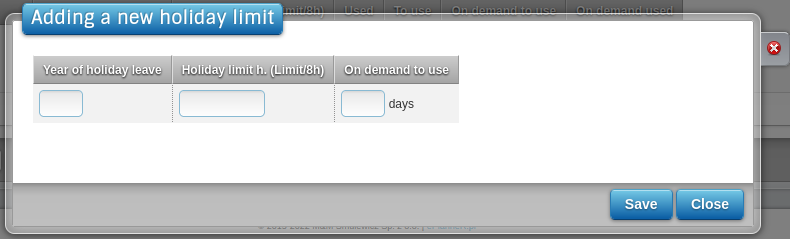 After clicking "Save" the data will be saved in the tab.
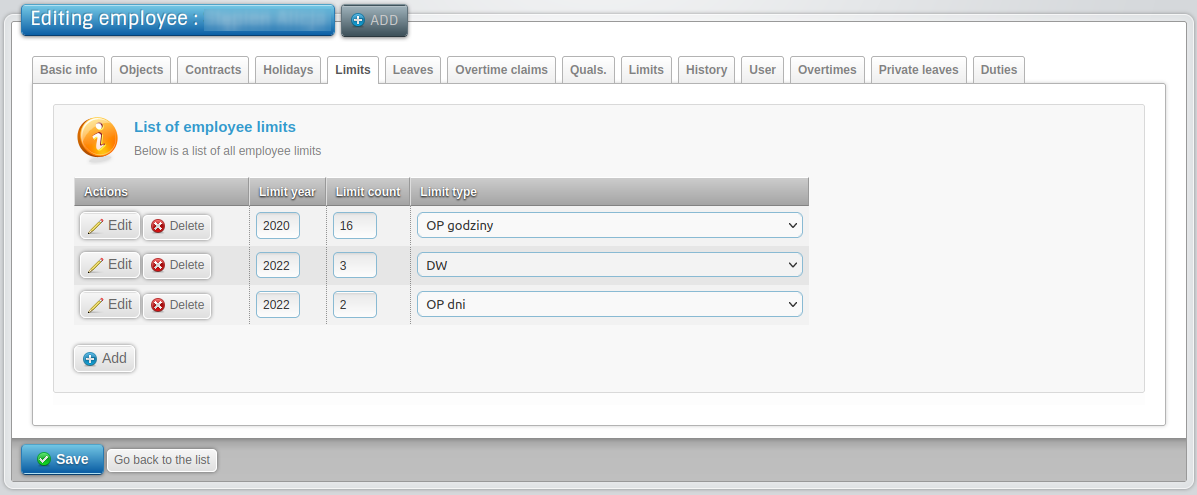
- 8Limits
-
In this tab, you can impose limits on the employee for selected absences. Limits must first be assigned to companies, to do so, please contact ePlanneR support. After adding a specific limit to an employee absenteeism, each application by the manager directly to the schedule or approval of the application will be made preceded by checking that the day / hour limit has not been exceeded.
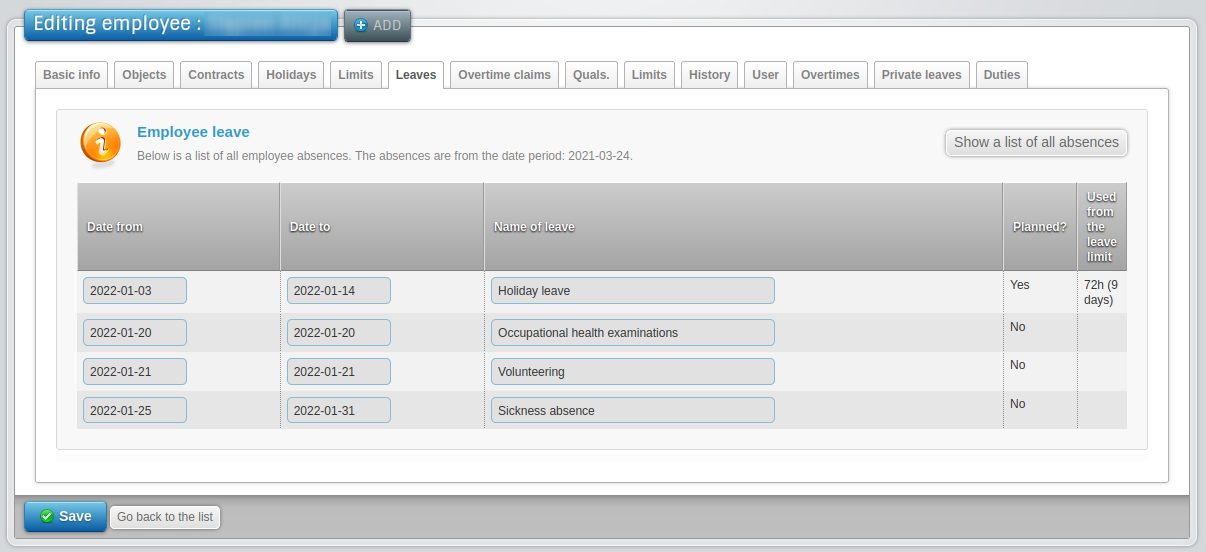
- 9Absences
-
This is where information about employee absences will appear, which may come from schedules or the workflow system requests. This is read-only data. Column "Planned?" informs you if the absenteeism has been added in stage planning (from the planned schedule) - "Yes", or from the schedule - "No".
- 10Pick-ups
-
In this tab, data on possible overtime pick-ups will appear. This is read-only data.

- 11Qualifications
-
Information about the employee's qualifications can be added here. Before that, the qualifications dictionary must be completed, which are present in a given company (Company page-> Positions-> Qualifications-> New qualification). We can add there e.g. energy licenses, forklift licenses, but also health and safety training, occupational medicine examinations, etc. employee attributes, the expiry date of which we need to keep an eye on. When adding a qualification, we obligatorily complete the type of qualification and its effective date for the employee. Optionally, we can add qualification scans ("Select a file") and comments.
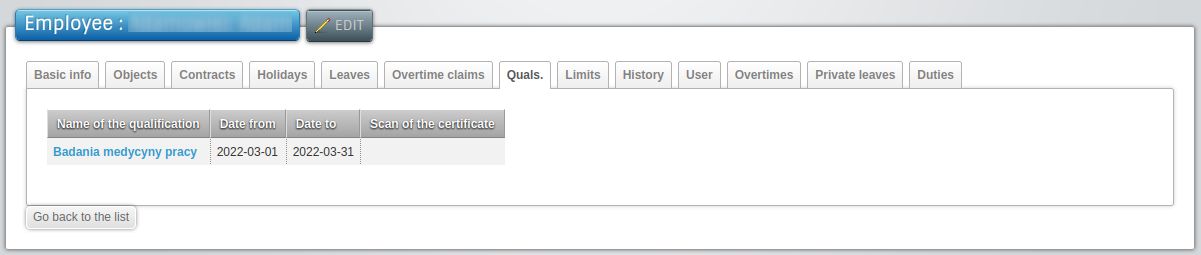 By adding this information, you will see warnings before the expiry on the "Notifications" page
qualifications. The "Employee Qualifications" report is also available at the bottom of the Employees page.
By adding this information, you will see warnings before the expiry on the "Notifications" page
qualifications. The "Employee Qualifications" report is also available at the bottom of the Employees page.
- 12Restrictions
-
In this tab, we can set restrictions on a single employee, e.g. a restriction for employees health service regarding the daily standard of working time - 7 hours 35 minutes a day. Before setting it for employee, you must add restrictions in the tab Company-> Extras-> Restrictions
- 13History
-
In this tab, you can enter into the system information on unsettled overtime from the previous months before launching the ePlanneR program in the company. This will allow you to collect them by using the "Overtime hours to be settled".

- 14User
-
In the User section, you will find information about the created user accounts for a given employee. In this tab we can:
- Change user's password
- Edit/add email address
- Add user the permissions
 To change user data you need to click "Edit"
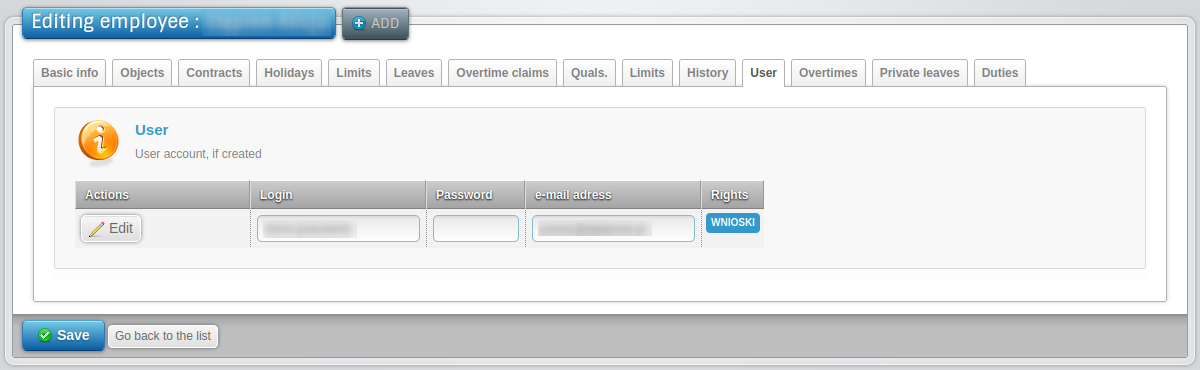
On "Edit" view you can enter or change:
- User login
- Email address
You may add access permissions. You can choose some predefined access levels:
- Admin - app administrator permissions, access to all tabs, the ability to edit all settings
- HR - authorizations for HR departments in the company, access to all tabs, the ability to edit most settings
- Manager - authorizations for department managers, access to all tabs except for the Company tab, possibility to edit planned and executed schedule, preview of data in the Employees tab
- Employee - permissions for Employees, access only to the Applications tab
Additionally, you can individually grant access to tabs for each user by selecting the appropriate one bookmarks in the list.
